
Getting Started
Overview
Oh the high level, processing bank transfer with Verify Payments is a three-step process, involving both server-side and client-side steps:
- (Server) Create a session using your Private API key including the
amount,currencyanddescription. - (Client) Initiate a Transfer from your website using the session created earlier with your Public API key.
- (Client) Customer completes the Transfer.
Here is how it looks:
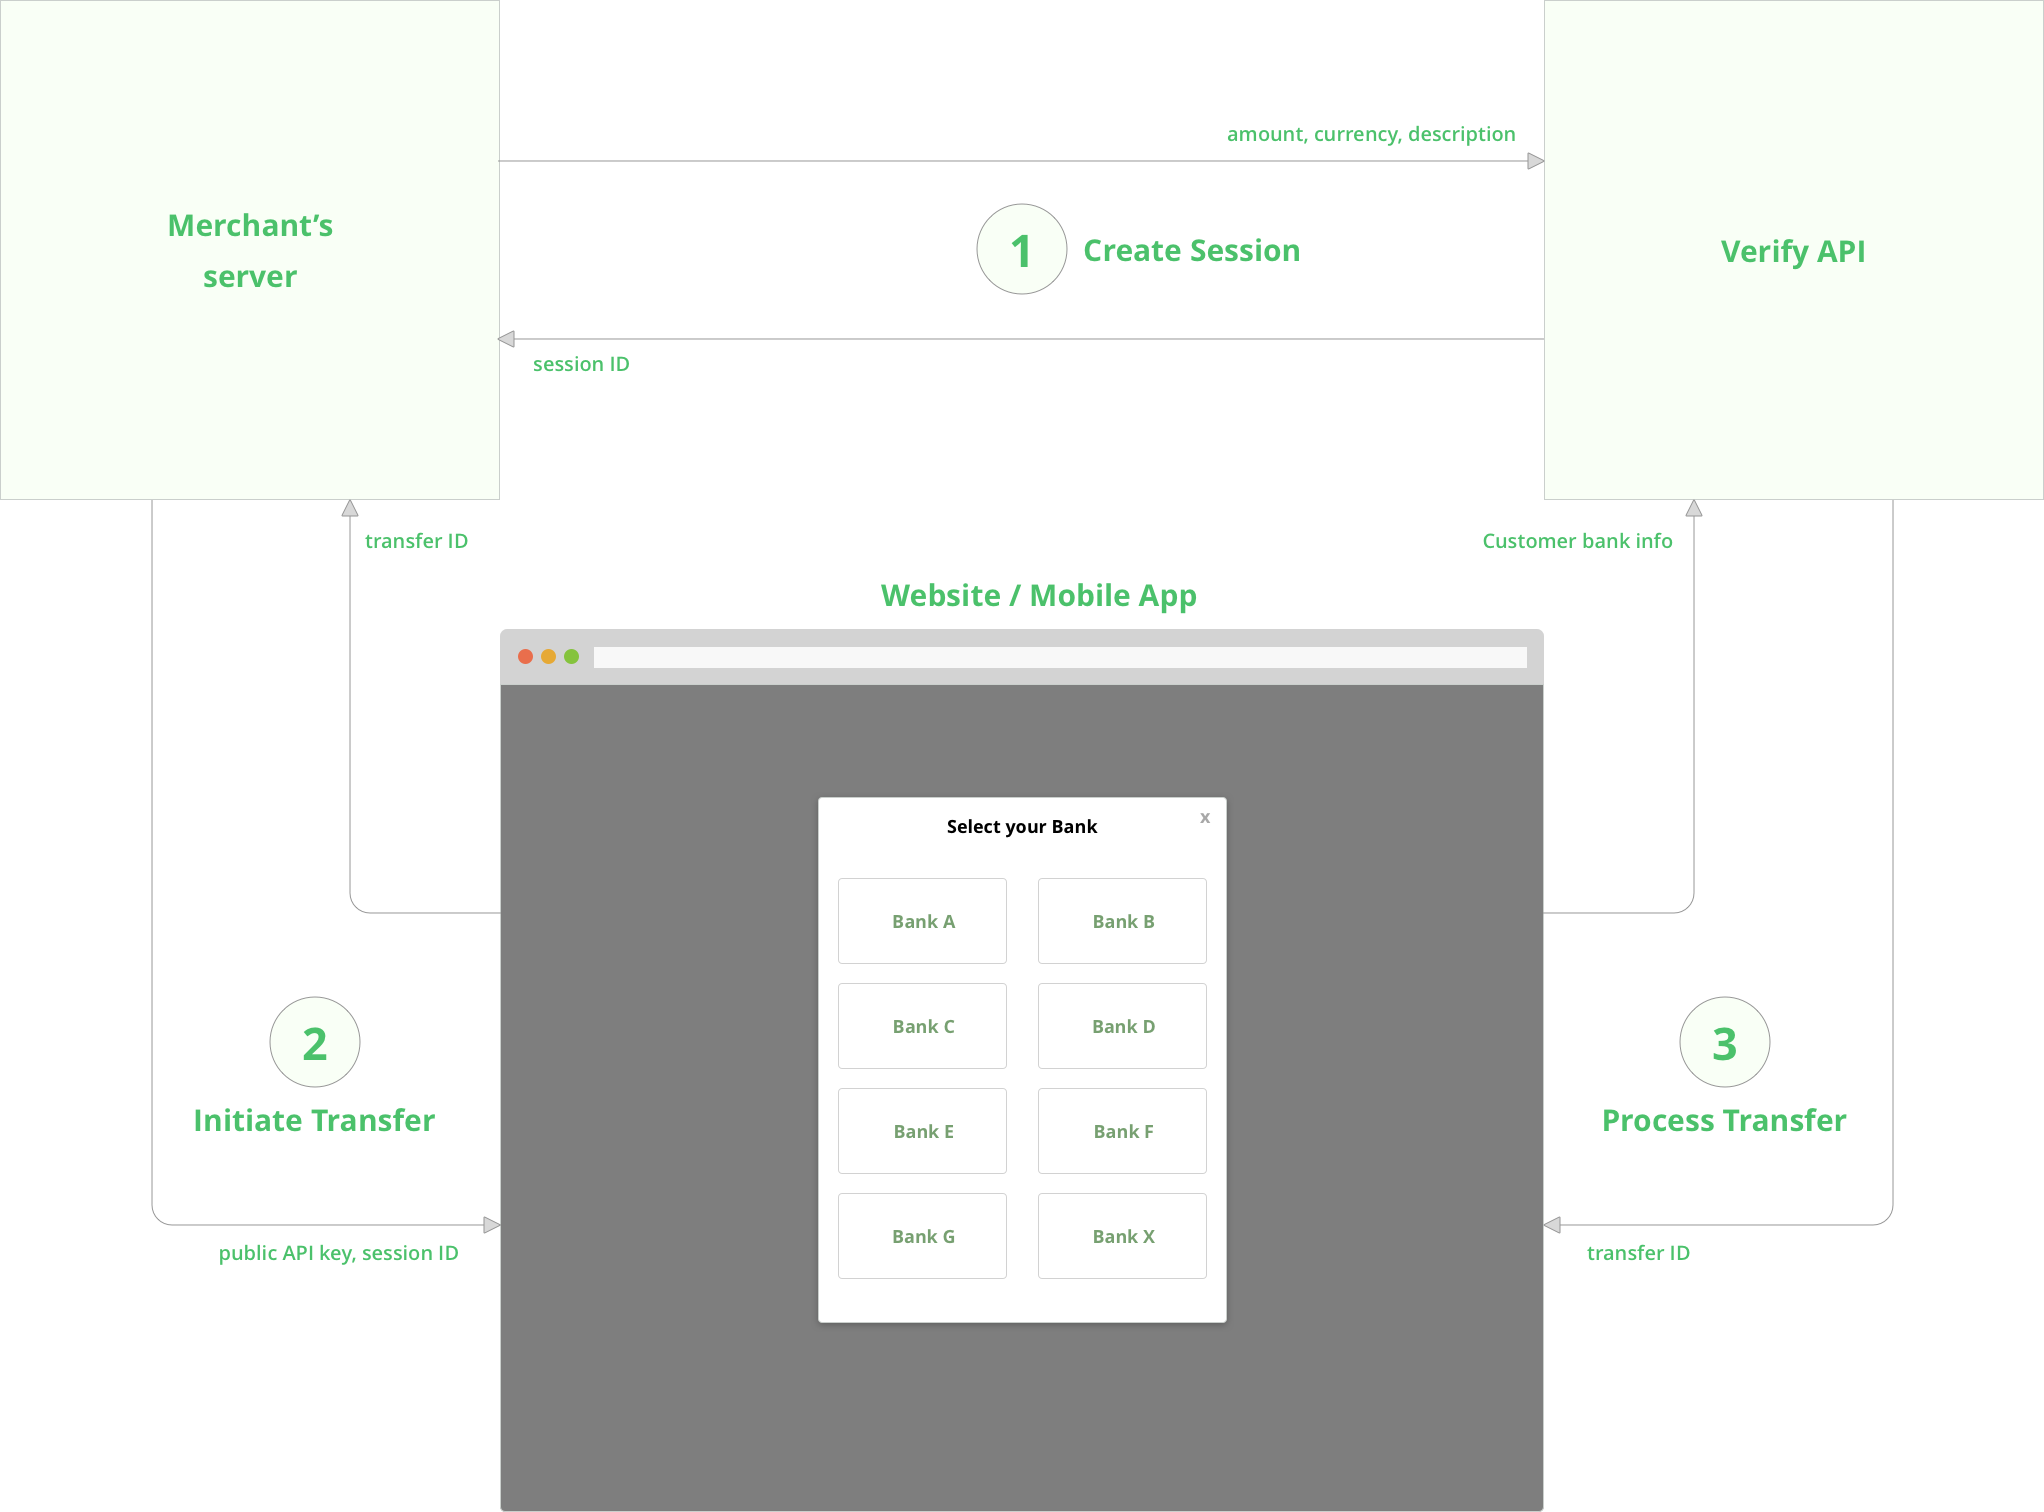
1. Create a Session
In order to create a session you have to make an API request including the amount,
currency and description to the following endpoint:
POST %api_endpoint%/sessions/
Here is an example in NodeJS:
// server.js
require('request');
var request = require('request-promise');

request.post({
  url: 'https://api.verifypayments.com/sessions/',
  'auth': {
    'bearer': '%test_secret_key%' /* secret key */
  },
  json: {
    currency: 'AED',
    amount: 1,
    description: 'Order #123 at Acme Inc'
  }
}).then(function(session) {
  /* Session created; send this to the client */
  console.log('Session ID: ' + session.id);
}).catch(function(err) {
  console.log('Error: ' + err.response.body.message);
});
2. Initiate Transfer
Now that the session is created, the client can use the Verify Javascript SDK
to begin a transfer. On page load, create a VerifyPayments object, passing
the appropriate configuration parameters. You may
call the show() method on this object in response to any event (e.g. a button
click):
<!-- index.html -->
<html>
<body>
  <!-- our Pay button -->
  <button id='btn-pay'>Pay</button>

  <!-- script at bottom of <body> -->
  <script src="https://js.verifypayments.com/sdk.js"></script>
  <script>
  const payment = new VerifyPayments({
    /* configuration parameters: */
    sessionId: 'SESSION_ID_SHOULD_BE_RENDERED_HERE',
    publicKey: '%test_public_key%',
    onComplete: function(transfer) { console.log('Transfer completed', transfer); },
    onClose: function() { console.log('Transfer window closed'); }
  });

  /* Add button click handler */
  const button = document.getElementById('btn-pay');
  button.addEventListener('click', payment.show);
  </script>
</body>
</html>
3. Process Transfer
When your customer clicks the 'Pay' button, a popup is loaded inside an iframe
that allows the user to complete the Transfer. When the transfer is processed,
the onComplete callback is called with a Transfer object parameter.
If you need any help integrating Verify Payments, let us know.
Integration Guide
Introduction
The following guide uses pseudo mobile wallet as an example appliction. It describes all steps and interactions between user, application, backend and Verify API when user top-up his wallet.
For the application we will use html and JavaScript to simplify code and make it obvious. If you work with iOS or Android all front-end code that works with JS-SDK can be replaced with corresponding mobile SDK code.
Full source code of the demo application can be found in our Github
repository. Front-end part
is located at ./public directory. Back-end part starts from ./index.js in
the root directory.
You can test our demo here: https://wallet-demo-app.herokuapp.com/
User Initiates Top-up
This section describes the 1st step of the transfer process:
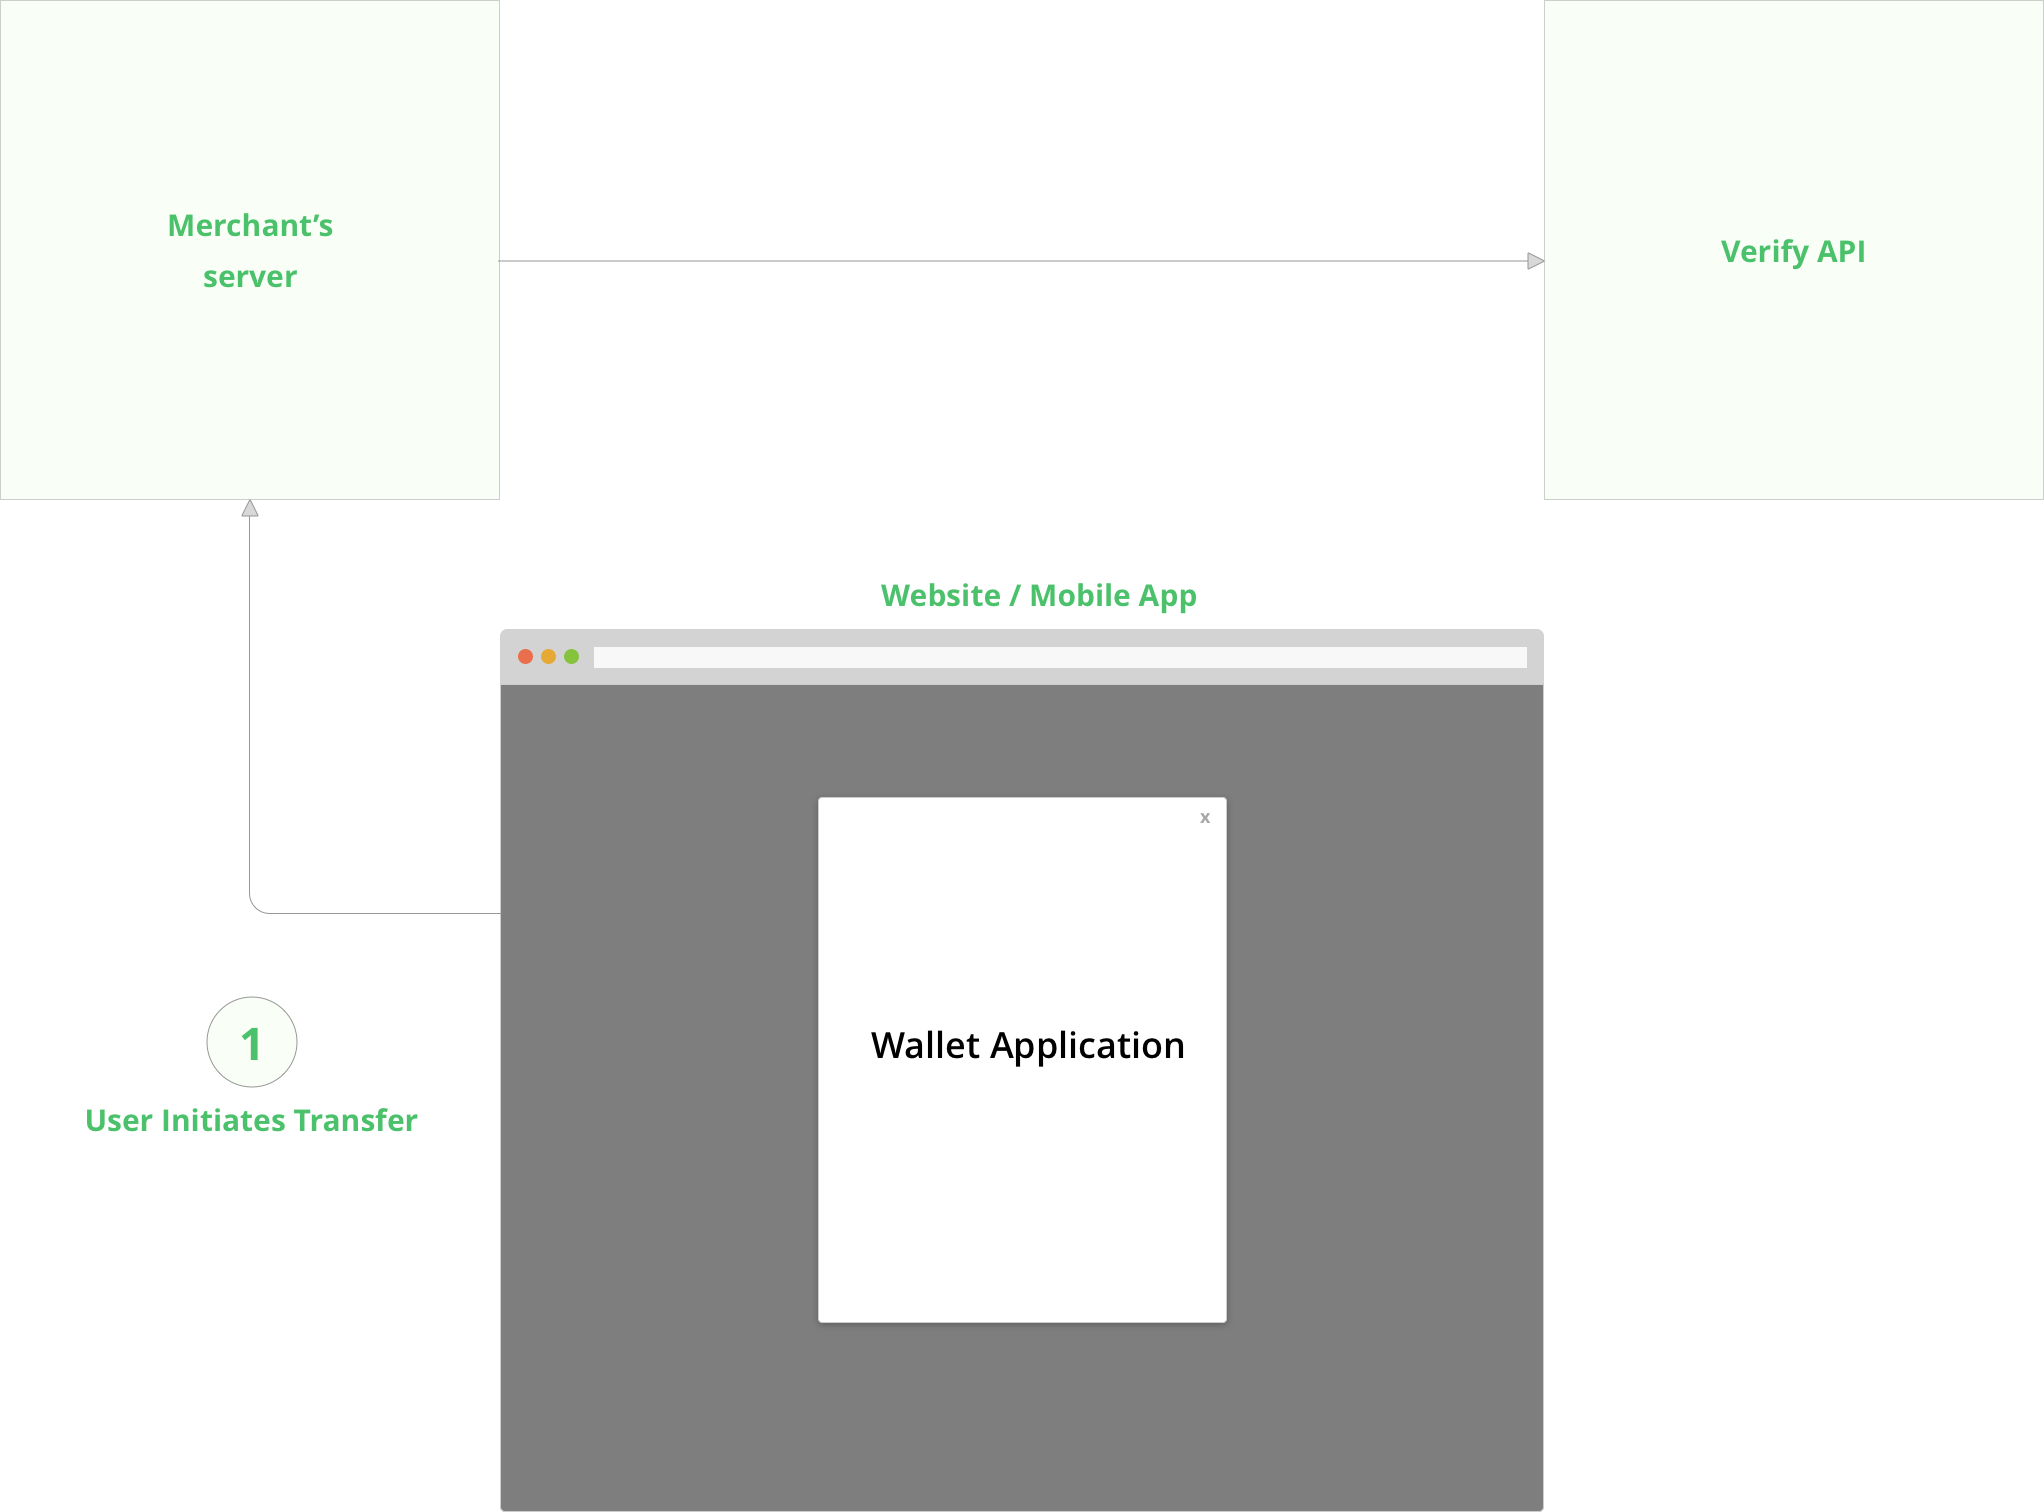
Everything starts from an application screen where user sets amount he willing to transfer to his wallet:
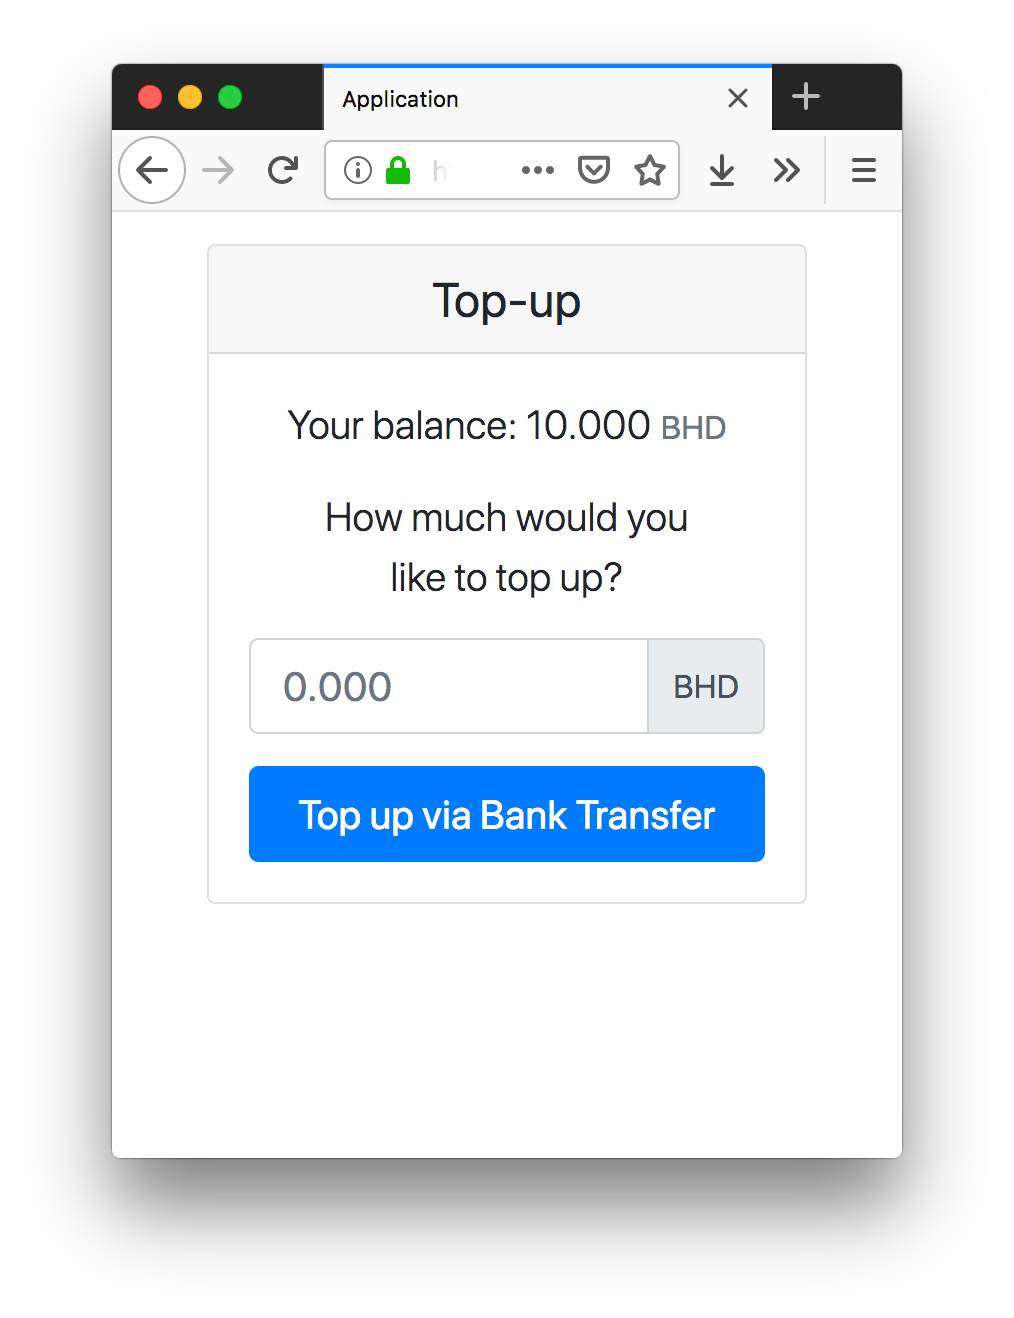
When user clicks 'Top up via Bank Transfer' button we create transfer session and after session is created we start transfer. Let's create a handler for the button:
var btn = document.getElementById('btnTopUp');

btn.addEventListener('click', function() {
  createSession({ onSuccess: startTransfer });
  btn.disabled = true;
  btn.innerText = 'Please, wait...'
});
Session creation involves two parties: your back-end and API of Verify Payments.
createSession method of your application will pass all required data for
session to your back-end. Let's look at it:
function createSession({ onSuccess }) {
  var amount = document.getElementById('amount').value;
  var data = { amount: amount, currency: 'BHD' };

  // call to your backend
  fetch(`${YOUR_DOMAIN}/sessions`, {
    method: "POST",
    headers: { "Content-Type": "application/json" },
    body: JSON.stringify(data)
  })
  .then(response => response.json())
  .then(json => {
    onSuccess(json.sessionId);
  });
}
}
It's time to switch to your back-end's sessions endpoint. On the backend we
will receive params from the application and make a call to Verify Payment's
API. What's really important here is to link created session with current user.
We need this in order to verify later that a transfer belongs to the user. The
following code creates session at Verify Payments for received amount and
currency and links it with current user:
app.post("/sessions", async (req, res, next) => {
  // you should load your current user from DB
  currentUser = new User();

  const amountInUnits = convertAmountToUnits(req.body.amount, req.body.currency)

  try {
    const session = await verifySDK.createSession({
      amountInUnits,
      currency: req.body.currency,
      description: 'Wallet topup'
    })
    currentUser.storeTransferSession(session);
    res.json({ sessionId: session.id });
  } catch (e) {
    next(e);
  }
})
verifySDK is a simple HTTP client for Verify Payments API. You can find the source code of this client here.
As result of this code our application receives sessionId.
Application Starts Transfer
This section describes the 2nd step of the transfer process:
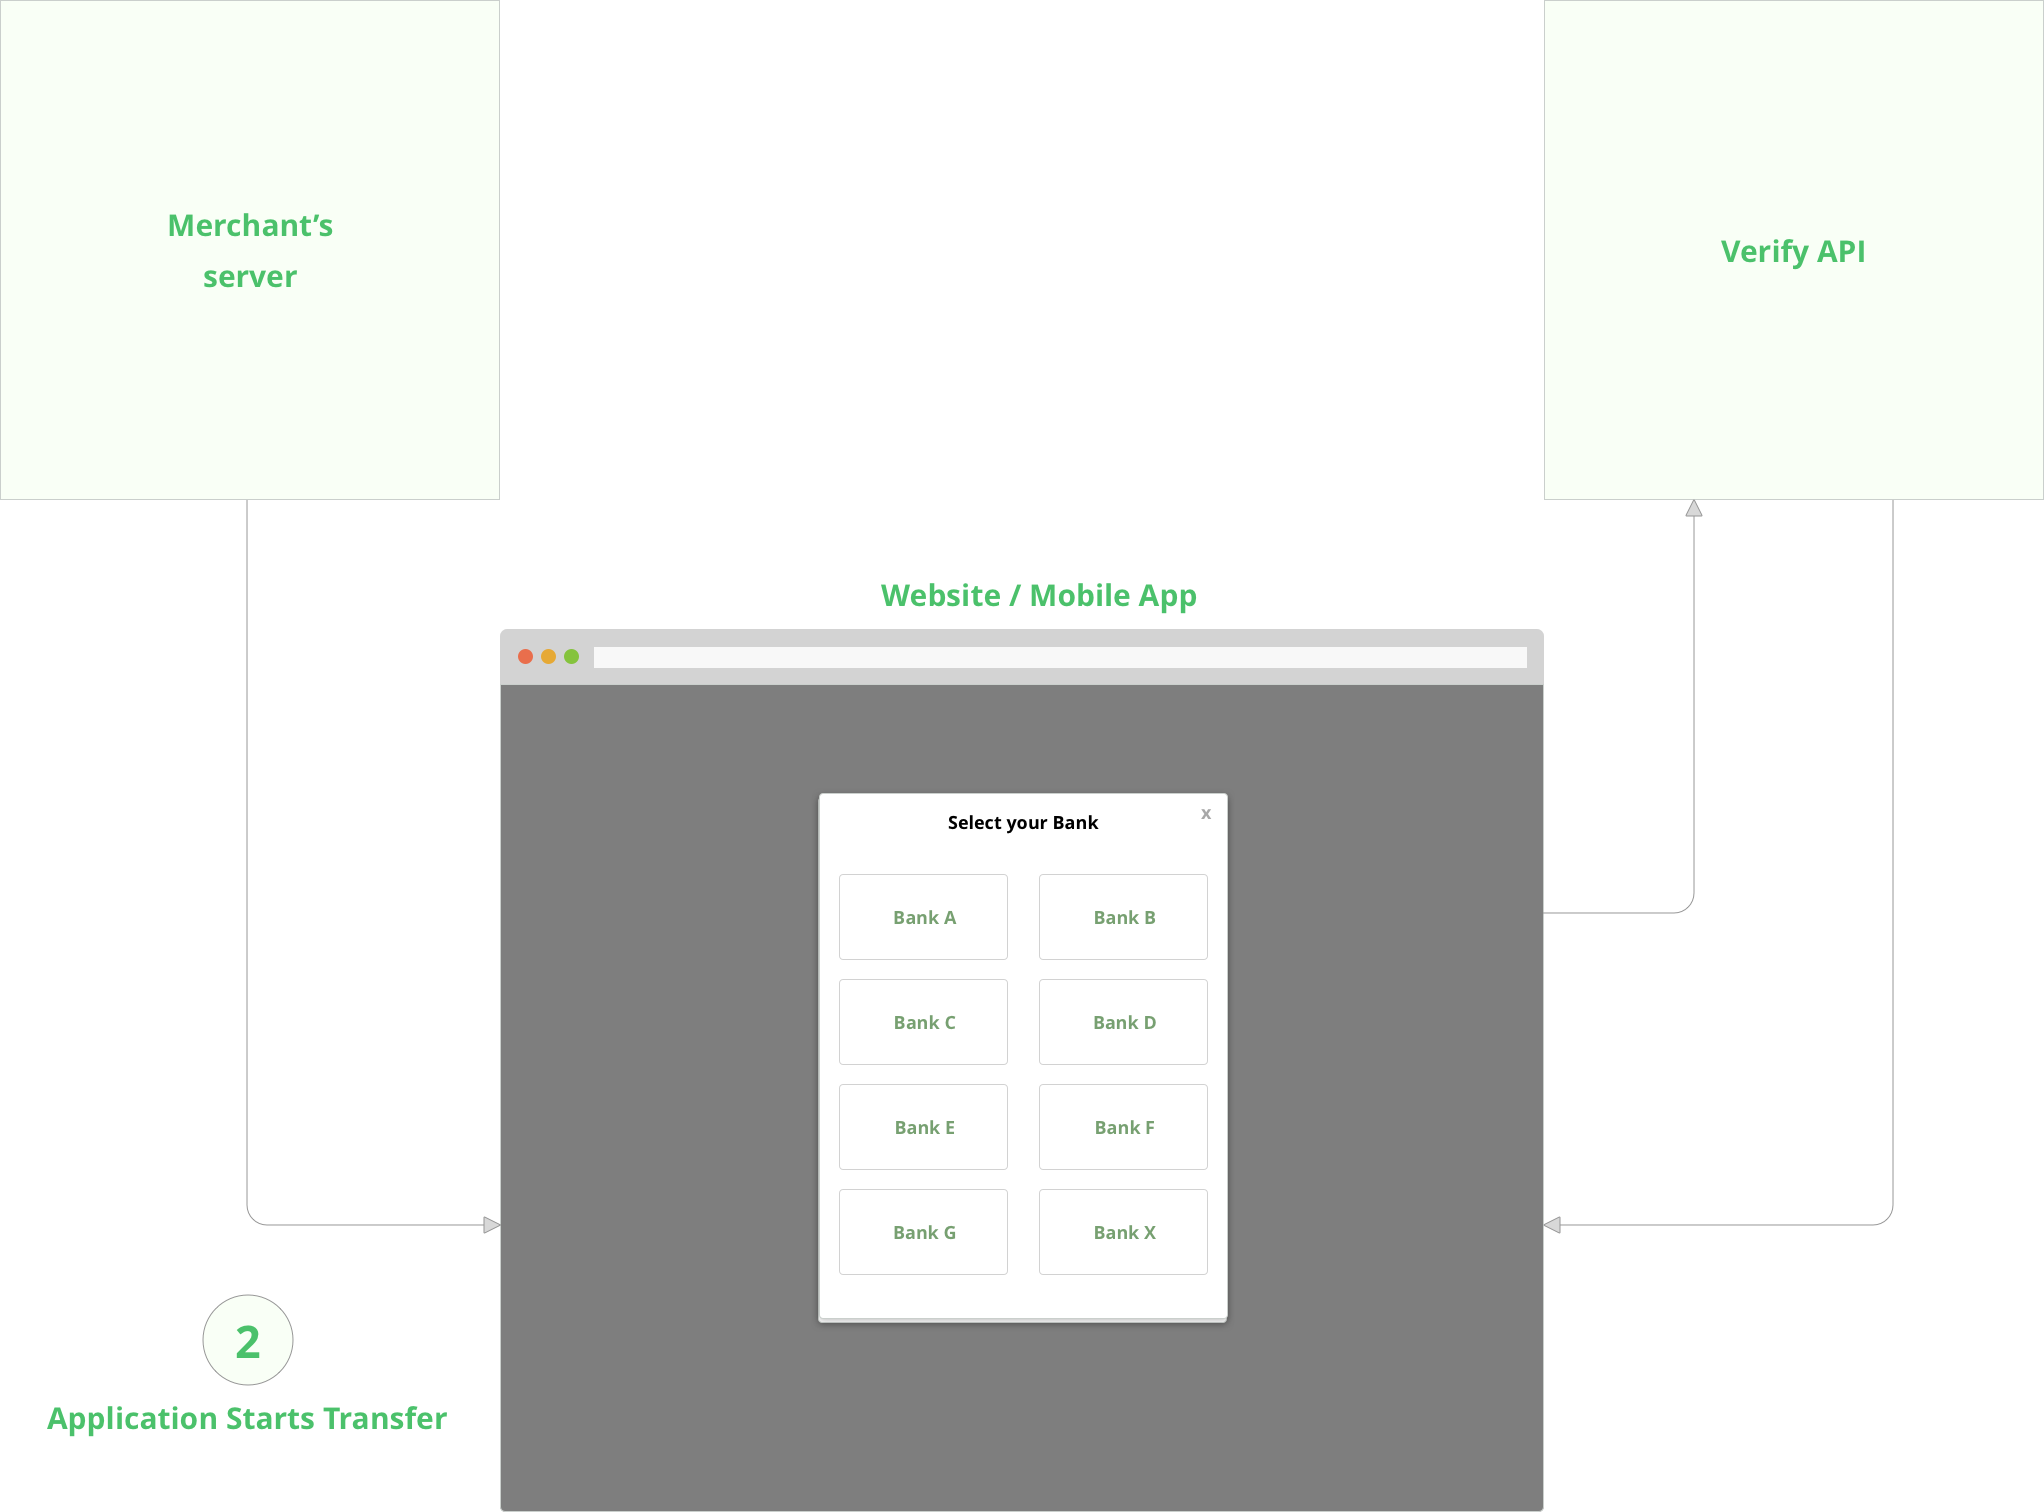
Having sessionId (it was received from back-end) application calls Verify
JavaScript SDK or mobile SDK to perform transfer:
function startTransfer(sessionId) {
  const payment = new VerifyPayments({
    sessionId: sessionId,
    publicKey: 'pk_test_iHpU1X3UlhcdH2OWWajvfE30bTWbeQ1D',
    onComplete: function(result) {
      if (result.object === 'transfer') {
        finalizeTopUp(result.id);
      } else if (result.object === 'error') {
        document.getElementById('failureMessage').innerText = result.message;
        hide(transferScreen);
        show(failureScreen);
      }
    },
    onClose: function() {
    }
  });

  payment.show();
}
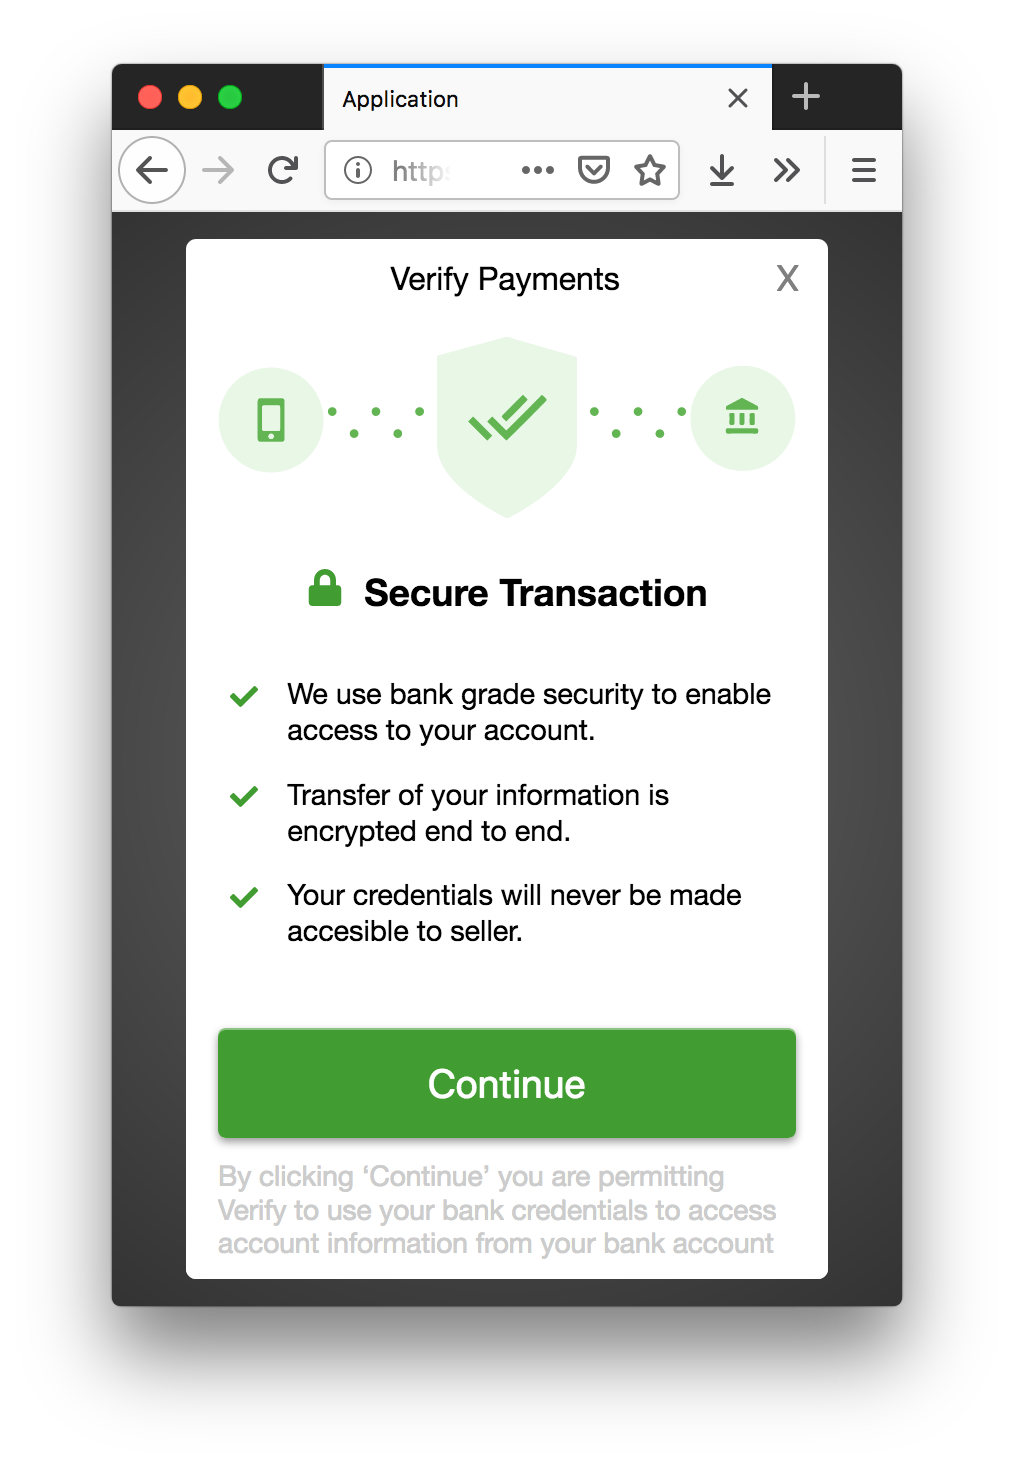
This method shows Verify Payment's screen where user can make necessary steps to complete transfer:
When transfer is completed SDK calls onComplete method and pass ID of
completed transfer. In our case it's finalizeTopUp.
Finalize Top-up
This section describes the 3rd step of the transfer process:
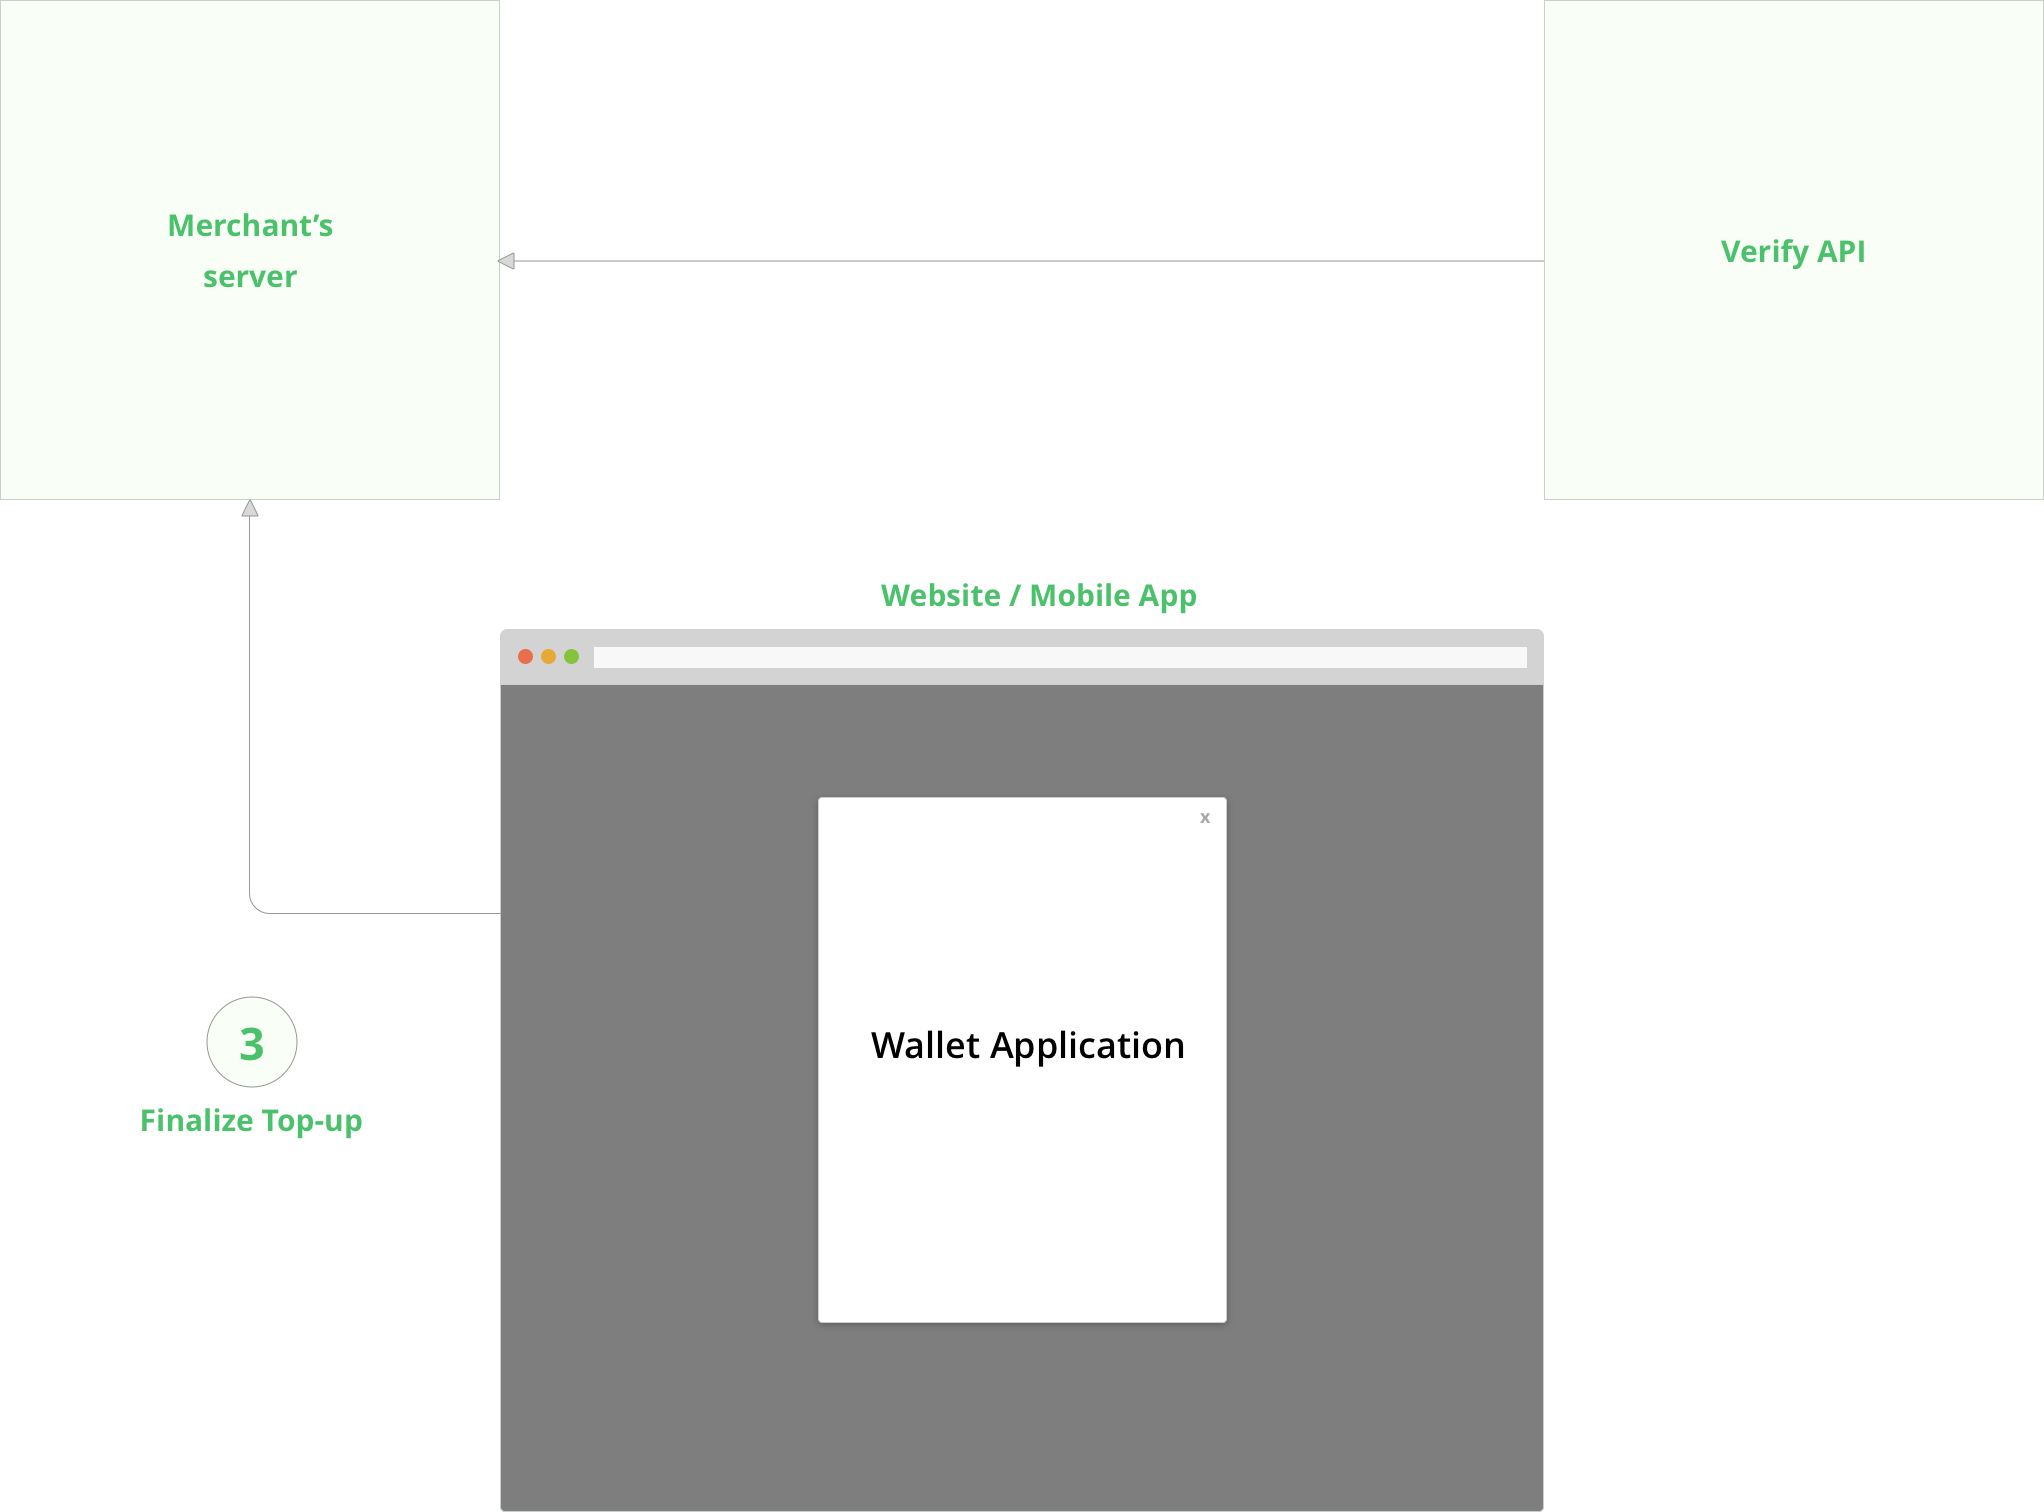
At the final step we have to update our back-end and show corresponding screen to the user.
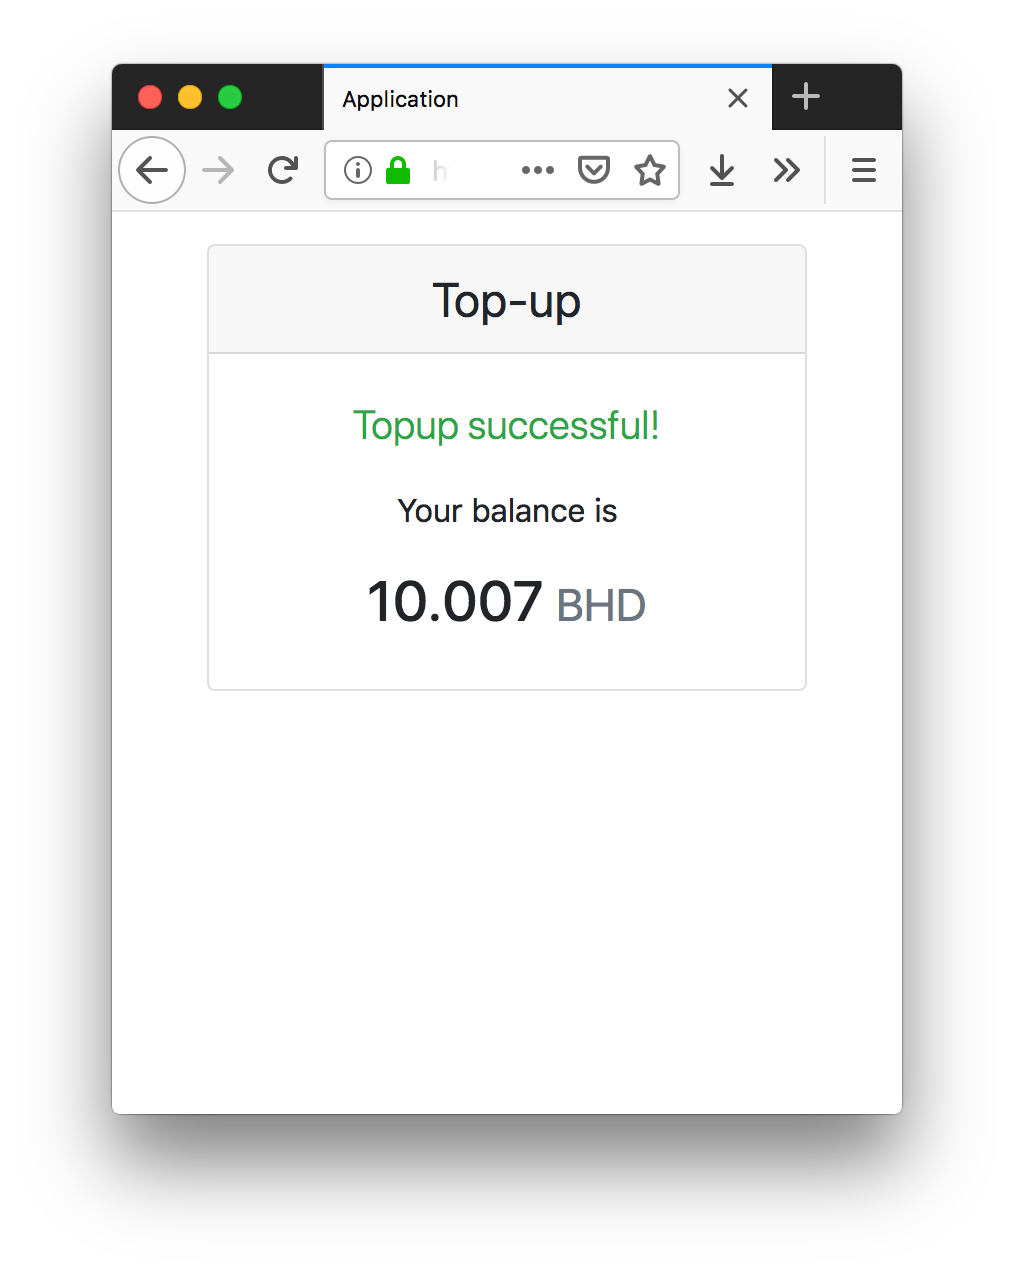
When transfer completes JavaScript SDK returns ID of transfer to the application. Using this ID we call back-end endpoint that will finalize top-up. After we receive response from the server we show success or failure screen to user. Here is the code from our application:
function finalizeTopUp(transferId) {
  fetch(`${YOUR_DOMAIN}/finalize-transfer/${transferId}`, {
    method: 'POST'
  })
    .then(response => response.json())
    .then(json => {
      if (json.status == 'success') {
        updateBalance(json.balance);
        hide(transferScreen);
        show(successScreen);
      } else {
        hide(transferScreen);
        show(failureScreen);
      }
    });
}
At the back-end we receive ID of completed transfer and pull full transfer information from Verify Payment's API. Then we check that this transfer is really belongs to current user and that this transfer is successful. After we perform this checks we can update current user balance with transfer amount. Look at the code of the endpoint:
app.post("/finalize-transfer/:transferId", async (req, res, next) => {
  try {
    const transfer = await verifySDK.getTransfer(req.params.transferId);

    if (transfer && currentUser.isTransferSuccessful(transfer)) {
        currentUser.updateBalance(transfer);
        res.json({ status: 'success', balance: currentUser.balance });
    } else {
        res.json({ status: 'failure' });
    }
  } catch (e) {
    next(e);
  }
})
As a final action our application, depending on received result (success or failure) shows corresponding screen:
If you need any help integrating Verify Payments, let us know.
Javascript SDK
Configuration options
The following options should be passed to VerifyPayments class:
| Parameter | Description |
|---|---|
sessionId |
The ID of the session created by your server-side script |
publicKey |
Your public API key |
onComplete |
The callback that is triggered after a Transfer is completed (includes transfer parameter) |
onClose |
The callback triggered when the payment popup is closed |
iOS SDK
iSO SDK is a developer friendly wrapper that uses WebView to open and manage our Javascript SDK.
You can find installation, configuration and usage instructions in the iOS SDK GitHub repository.
Android SDK
Android SDK is a developer friendly wrapper that uses WebView to open and manage our Javascript SDK.
You can find installation, configuration and usage instructions in the Android SDK GitHub repository.
API Keys
You can authenticate requests to the Verify Payments API by including an API key in the request that you send. Every account (whether Test or Live) has a pair of API keys: secret and public.
The secret keys are used to authenticate with the API — keep these private! Make sure not to commit them to your source code repositories or share them. The public keys used on the client side with our [Javascript SDK] in web or mobile application where they can be easily seen by other developers.
We tried to make it easy to distinguish test API Keys from live ones and secret
from private. Here is how. Each API key has a prefix sk or pk which
means secret key or public key. Also, each API key contains the word live or
test. If your API key looks like this: pk_test_aPx0PtQprQ... it's a public test
API key. If it looks like this sk_live_dQODRGgH... it's a secret key of a live account.
Contact us to get your API keys for test or live account.
Testing
Thoroughly test your integration before going live using test information provided below.
Test Account
Inside VerifyPayments you have a Test Account which lets you test your integration. Test Account works with a Test Bank. So, all transactions are imitated and you can perform testing without being worred about real money.
Test API Keys
When you perform API requests or use Javascript SDK you have to use API Keys of a test account.
Currencies and Balance
Test Bank supports AED, BHD and USD currencies. Inside Test Bank you have three accounts:
- AED account with 10.00 AED balance
- BHD account with 1.000 BHD balance
- USD account with 10.00 USD balance
Test Credentials
The following usernames can be used during login to produce specific results, useful for testing different scenarios:
| Username | Result |
|---|---|
failure |
Login fails |
test |
Login succeeds and transfer succeeds as well |
test_otp |
Request for OTP during login, transfer succeeds |
test_questions |
Request for secret questions during login, transfer succeeds |
test_transfer_failure |
Login succeeds but transfer fails |
test_transfer_otp |
Request for otp before transfer, transfer succeeds |
test_transfer_questions |
Request for otp before transfer, transfer succeeds |
Support
We would be glad to help you with any questions. Just let us know if you need any help at [email protected].